How to Upload Bulk Students in Moodle
This article provides the data you need to successfully upload & create multiple user accounts to your Lambda Learn LMS using a .CSV (comma separated values) text file.
TOPICS
- UPLOAD USER PROCESS USING A CSV
- STEP1: Create the CSV Text File
- Required Profile Fields
- Optional Contour Fields
- User Passwords
- Custom Profile Fields
- Enrolment Fields
- Cohort Membership Assignment
- Footstep two: Upload the CSV
- STEP 3. Preview the Uploaded Information & Configure the Settings
- STEP1: Create the CSV Text File
-
- Footstep 4: Confirm & Review the Results
- All-time PRACTICES & Common MISTAKES
Upload User Procedure Using a CSV File
In that location are multiple methods to bulk create and manage user accounts in your Lambda Learn LMS. The simplest method is to create a file commonly referred to as a .csv (comma separated values) text file and to upload information technology to your LMS. With this method you can accomplish several tasks, such as, enrol users in multiple courses with course specific roles, to updating user information in the User contour, even to "deleting" users from your site.
The following are the basic steps you lot take in the process of uploading users using a CSV text file:
Footstep 1: Create the CSV Text File
'Flat file' is the name of a elementary data file formatted so that each row contains one user account, and each column contains values for a particular field of the account. The apartment file can be created using a elementary text editor, such as Notepad++, or using a spreadsheet such as MS Excel or Google Sheets.
Required Profile Fields
Each new user account on a Lambda Learn site requires the following minimum information: username, firstname, lastname, electronic mail.The screenshot below shows y'all what a basic user upload csv text file looks like in a text editor.

Information technology is important to go along in mind that each value is separated by a comma - with NO additional space earlier or after the commas.
When using a spreadsheet your file would look similar this:

| | Annotation |
| Every bit you already are likely to know, unless y'all consciously select a specific file format, your software volition save a newly created file in its own default format - i.e. every bit .txt in Notepad++; and every bit .xsl in Excel. When creating your file using either of these programs, you must save information technology equally a .csv file type. | |
Optional Profile Fields
More commonly, organizations like to keep some farther information equally office of their users' profiles. To provide values other than the default you lot tin include one or more of these optional user fields:
password,establishment,department,city,land,lang,auth,timezone,idnumber,icq,phone1,phone2,address,url,description,mailformat,maildisplay,maildigest,htmleditor,autosubscribe,interests,theme
| land - utilize the country TWO LETTER CODE, in upper instance, eg AU,ES,GB,US. These are all UPPER CASE. Using "au" or "es" or "Us" as a state code will consequence in a database mistake. If you are having problem working out the 2-letter of the alphabet code for a state, you can consult the list of state names and code elements available on the ISO Website. A mutual error is to use UK for U.k.; it should be GB. |
| lang - use the two letter (or extended four lettter) code as divers in the Moodle language packs, e.one thousand. en, es, en_us, de, inSite administration > Linguistic communication > Linguistic communication packs. |
| timezone - Should exist in the format as found in the Location settings in terms of Zone/Region, eg. Australia/Sydney, Asia/Kathmandu, Europe/Madrid, etc. The entry is case sensitive so Europe/London will work simply europe/london will not. Timezone setting is need for:mailformat, maildisplay, htmleditor, autosubscribe. |
| maildigest To prevent users from receiving a large number of emails from courses or forced subscription forums use themaildigest. The options for this field are 0 = No digest, 1 = Complete digest and two = Digest with just subjects. |
| maildisplay allows you lot to set the email display option for a user. The options for this field are 0 = Hide my electronic mail accost from non-privileged users, 1 = Allow everyone to meet my email address and 2 = Allow simply other course members to see my email address. |
| theme User themes may be added past using 'classic', 'boost' or the name of any other installed theme. |
| auth - The auth field must be used if the site uses an culling authentication method, such as LDAP, as otherwise the authentication method volition default to manual and users using a different auth method won't be able to log in. Utilise the shortname codes defined in Plugins > Authentication for the various types, e.k. transmission, nlogin, ldap, cas, mnet, db, none. If you lot do not include an auth column, then newly created users volition be created with the manual account type. You can set "auth" to "nologin" in your csv file which volition hateful that then created users cannot login. |
In society for the LMS to know which exact fields in the user profiles will be populated with the information in our file, a header row indicating what field data is carried in each column needs to be inserted to the very height, every bit shown in yellow highlight in the image below:
| | NOTE |
| The ordering of the columns do not matter, so long as the correct field names are written to the elevation of each column. | |
User Passwords
The password field is optional if the 'New user password' setting on the upload screen is prepare to "Create password if needed and transport via email".
The password field is required if the setting is "Field required in file".
If included, values should meet the requirements you have gear up for your site'due southPassword policy.
To force countersign change for a particular user, set the password field to changeme . If omitted, a password will be generated for each user (during the adjacent Cron job) and welcome east-mails sent out. The text for the welcome e-mail is in the language settings inSite assistants > Language > Language customisation with a String identifier of 'newusernewpasswordtext'.
Custom Contour Fields
These are optional and depend on whether you have created any custom contour fields in your site. The name of the header in file is of the course 'profile_field_xxxxx' where xxxx is the unique shortname of custom user profile field name as you lot created it.
The field name should match the case of the profile field shortname. So, for instance if the shortname of your custom profile field is all upper case, for case,DOB, then utilize a header ofprofile_field_DOB to lucifer the instance, notprofile_field_dob, which will produce a "is non a valid field name" error.
As well, a mixed case shortname such every bitDob should have a header ofprofile_field_Dob. (The exception to this is if the shortname is all lower example, so any instance will work in the field header, which is a historical quirk: but best practice is to match the instance and you volition avoid errors.)
For custom profile fields that are dates, use the ISO standard format YYYY-MM-DD, eg. 2014-06-19 which volition then be properly localized in the interfaced. For instance, a field called dohire for "appointment of rent", the fields could be:
username,firstname,lastname,electronic mail,profile_field_dohire
blumbergh,Pecker,Lumbergh,blumbergh@case.com,1990-02-19
pgibbons,Peter,BGibbons,pgibbons@example.com,1996-06-05
tsmykowski,Tom,Smykowski,tsmykowski@example.com,1970-01-01
Enrolment Fields
You may optionally enrol users in already existing courses using manual enrolment. Simply manual enrolment is done this way; if the transmission enrolment method is disabled in a grade, so no enrol is done.
You lot add fields in the upload file of this blazon:
course1,type1,role1,group1,enroltimestart1,enrolperiod1,enrolstatus1,course2,type2,role2,group2,enroltimestart2,enrolperiod2,enrolstatus2
| course# is the shortname of the course, if present the user will be enrolled in that course. Do non use the fullname of the form or it volition generate an error. This field is the ONLY required field for a succesful enrolment. All the others are optional. |
| type# sets the role to be used for the enrolment. A value of 1 is default course function, 2 is legacy Teacher role and 3 is legacy Non-editing Teacher. |
| role# may be used to specify roles directly, using either role short name or the part id (numeric names of roles are not supported). Usually you will use the part name that is the shortname of the role as defined in Users > Permissions > Define roles, eg. student, editingteacher. If the part column is left out, the users will be enroled in the form with the default office, which is normally student. |
| group# may be used to assign users to groups in course, using name or id (numeric group names are not supported). NOTE: if the group does not already be, it will exist created. |
| enroltimestart# may be used to set the enrolment outset time, for each course. If not explicitly set here, the enrolment get-go time is set to be today. |
| enrolperiod# may be used to fix the enrolment elapsing, in days, for each course. If not explicitly set here, all the users will get the duration every bit set in the Manual enrolment method of the course (which defaults to 0 meaning unlimited.) |
| enrolstatus# is optional as by default all newly enrolled users are set to active. If used a value of 1, it volition suspend users in the grade and if a user is previously set as inactive / suspended then a value of 0 will unsuspend them and make them active again. |
For details on bulk user cosmos and class enrolment using a *.csv text file, seeCreate and Enrol Users with a CSV File.
| | Notation |
| Header fieldsmust have a numeric suffix such that type1,role1,group1,enrolperiod1 and enrolstatus1 all apply to course1 for grade1 to course northward . Even if you lot are just doing one class enrolment, yous must still use the number one on the heading proper noun, i.eastward. course1,role1, etc. Do non utilise the bare headings without numbers, e.g. form,function, etc as those will generate an mistake. | |
Cohort Membership Assignment
You tin can assign users to any already existing Cohort by using only the "username" and the "Cohort ID" with just two fields in the file.
Note that this is an exception to the usual case where the firstname, lastname and email address of the user are required.
cohort# is the form to employ and like enrolment in courses, you lot accept to add together a number to each header, and then cohort1,cohort2, etc.
Internal cohort id numbers or not-numeric Cohort IDs of existing cohorts must be used; practice not use the total proper name are not allowed. (Note that cohort id is what is unremarkably known elsewhere as the "shortname".)
Here is a sample CSV file:
username,cohort1,cohort2
student1,nursing,Springclass
student2,nursing,Springclass
student3,nursing,Springclass
When your file is ready, go on to the next step of file upload.
STEP ii: Upload the CSV
To start the upload procedure, navigate toSite assistants > Users > Accounts > Upload users.

On the Upload users page that opens, click on the 'Choose a file...' button and navigate to the csv file you want to upload. There volition be additional settings, just yous may leave those equally their default values.
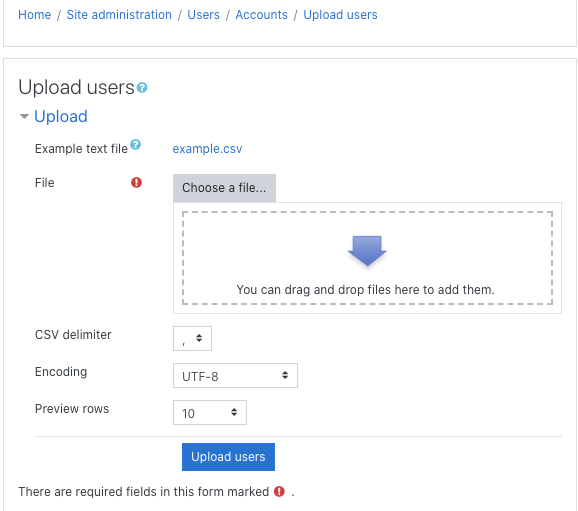
Confirm that you accept selected the right file, and click the 'Upload users' button.
| | TIP |
| As a all-time practice, nosotros strongly recommend that yous exam the upload process with a file that only contains the peak three-4 rows of your master user data file, before going alee with uploading the complete user data. This test upload will requite you the run a risk to take hold of whatsoever glitches in the process and to review what the resulting new user accounts will look like. Later on confirming that these initial accounts were created as intended, y'all volition be fix to upload the complete file. | |
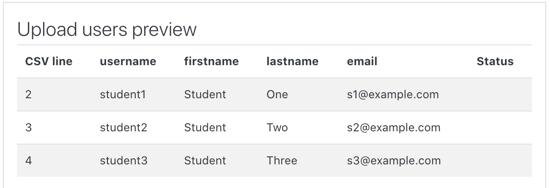
STEP iii. PREVIEW UPLOADED DATA & CONFIGURE SETTINGS
Once your file has been uploaded, you lot will exist presented with a preview of the data that has been uploaded.
Users Preview
The preview window gives you lot a glimpse into the end result. This is the place to grab major formatting-related issues.
Upload Users Settings
These settings determine how the information in your file will be candy. Below is a brief overview of these settings:
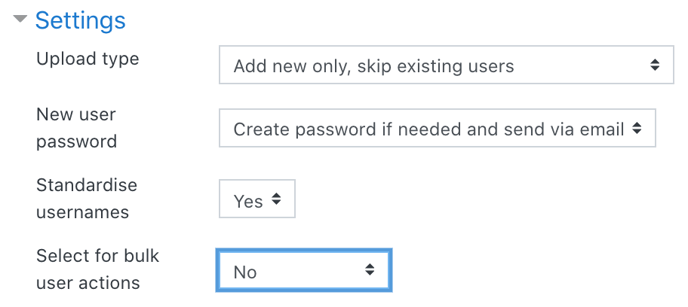
| Upload type The Upload type specifies how to handle existing accounts.
|
| New user countersign When creating a new user account, Lambda Learn can create a new password (if one is not provided) or crave a password in the uploaded file.
|
| Standardise usernames Standardise usernames is used past default to catechumen the username to all lower case and to strip out illegal characters. It is possible to not standardise the usernames; however, doing so isnon recommended.
|
| Select for bulk user deportment Past default, no users are selected .
|
Default Values
This section of the screen offers yous quick access into the default values for user profiles on your site. This gives you the option to alter the values so that the profiles of the newly uploaded/updated users volition reflect these modifications.
One setting worth noting is the first row in this section which allows you to 'Choose an hallmark method'. If you lot set different authentication methods to be used with different groups of users on your site, you take the option to set up these different preferences for groups of users 'per flat file'.
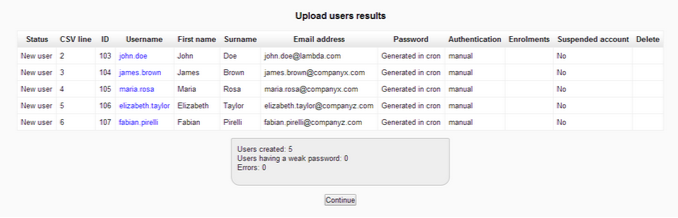
Step iv: Confirm & Review Results
This is the moment when the user accounts are actually created or updated. One time the process is complete, you lot are presented with a 'results' screen. In addition to listing the new/updated users, the bottom of this screen will give you the total number of users created, as well as if there were any errors.
BEST PRACTICES & COMMON MISTAKES
-
Ensure that you have saved the file in .csv format.
-
Ensure that the field names are entered correctly on the top row of the .csv file.
-
If using a text editor to create your CSV file, retrieve to place consecutive commas with no space betwixt when certain fields are empty for sure users, in order to correctly match the user information to the correct field names.
-
State lawmaking convention: use two letter abbreviation (eg. United States = us, Canada = ca)
-
Field size limits must be within your site maximum.
-
Duplicate email entries used without selecting 'update existing accounts' as upload type volition crusade user account conflicts and cause the upload to neglect.
-
We recommend using UTF-viii encoding on the file.
Source: https://www.lambdasolutions.net/knowledgehub/uploading-users-using-a-csv-text-file